Azure Kubernetes Service (AKS) is a managed container orchestration service provided by Microsoft Azure. It simplifies deploying, managing, and scaling containerized applications using Kubernetes, an open-source container orchestration platform.
Key Features
- Managed Kubernetes:
- AKS provides a fully managed Kubernetes cluster, handling most administrative tasks, such as upgrades, patching, and monitoring.
- Easy Cluster Management:
- AKS integrates with the Azure portal, Azure CLI, and Azure Resource Manager (ARM) templates, making it easy to create, configure, and manage Kubernetes clusters.
- Scaling:
- AKS supports horizontal scaling of applications and clusters. You can manually scale nodes and pods or set up auto-scaling to handle variable workloads.
- Security and Compliance:
- AKS offers built-in security features, including Azure Active Directory (AAD) integration for authentication, RBAC (Role-Based Access Control), and network policies.
Integrated DevOps:
- AKS integrates seamlessly with Azure DevOps for CI/CD pipelines, making it easier to build, test, and deploy containerized applications.
- Monitoring and Logging:
- AKS integrates with Azure Monitor and Azure Log Analytics for comprehensive monitoring, logging, and alerting of your Kubernetes clusters and applications.
Hybrid and Multicloud Support:
- AKS supports hybrid cloud scenarios through Azure Arc, allowing you to manage Kubernetes clusters across on-premises, Azure, and other cloud providers.
Key Concepts
Cluster:
- A set of node machines for running containerized applications. In AKS, the control plane is managed by Azure, and users manage the worker nodes.
Node:
- A single machine in a Kubernetes cluster, which can be a virtual machine (VM) or a physical machine. Nodes host pods.
Pod:
- The smallest deployable unit in Kubernetes, consisting of one or more containers that share storage, network, and a specification for how to run the containers.
Namespace:
- A way to divide cluster resources between multiple users or teams, providing a scope for names.
Deployment:
- A Kubernetes resource for managing a set of identical pods, ensuring the desired number of pods are running and updating them as needed.
Service:
- An abstraction that defines a logical set of pods and a policy to access them, usually to expose applications running in pods.
Deployment Workflow
Cluster Creation:
- Use the Azure portal, CLI, or ARM templates to create a new AKS cluster.
az aks create --resource-group myResourceGroup --name myAKSCluster --node-count 3 --enable-addons monitoring --generate-ssh-keysConfiguring kubectl:
- Connect to the AKS cluster using
kubectl, the Kubernetes command-line tool.
az aks get-credentials --resource-group myResourceGroup --name myAKSCluster- Connect to the AKS cluster using
Deploying Applications:
- Deploy your containerized applications using YAML configuration files.
yaml -piVersion: apps/v1kind: Deploymentmetadata:name: myappspec:replicas: 2selector:matchLabels:app: myapptemplate:metadata:labels:app: myappspec:containers:- name: myapp-containerimage: myregistry.azurecr.io/myapp:latestports:- containerPort: 80kubectl apply -f myapp-deployment.yamlScaling Applications:
- Scale the application as needed.
kubectl scale --replicas=5 deployment/myappMonitoring and Logging:
- Monitor and log the application using Azure Monitor and Log Analytics.
How to setup AKS cluster
Prerequisites
Before we begin, ensure you have the following prerequisites:
- An Azure account. If you don’t have one, you can sign up for a free Azure account
Sign in to Azure Portal
- Open your web browser and navigate to the Azure Portal.
- Sign in with your Azure account credentials.
Create a Resource Group
- In the Azure Portal, click on “Create a resource” from the left-hand menu.
- Search for “Resource group” and select “Resource group” from the results.
- Click the “Create” button.
- Enter a unique name for your resource group, such as “MyAKSClusterResourceGroup”
- Choose a region for the resource group (e.g., East US).
- Click the “Review + create” button and then click “Create” to create the resource group.
Create an AKS Cluster
- In the Azure Portal, click on “Create a resource” again.
- Search for “Kubernetes Service” and select “Kubernetes Service (AKS)” from the results.
- Click the “Create” button to start the AKS creation wizard.
Basics
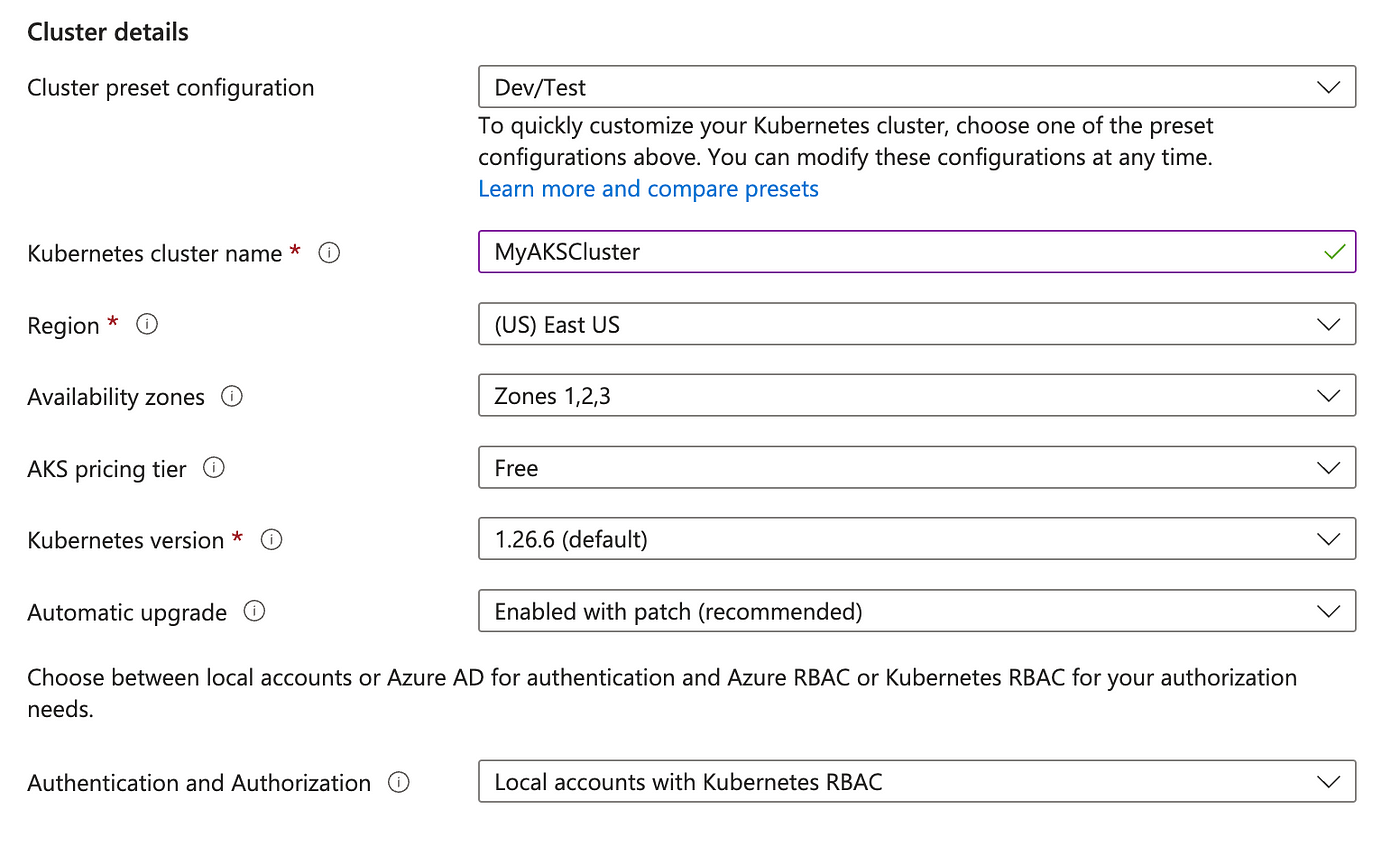
1. In the “Basics” tab of the AKS creation wizard:
- Choose your Azure subscription.
- Select the resource group created before (“MyAKSClusterResourceGroup”).
- Enter a unique name for your AKS cluster (e.g., “MyAKSCluster”).
- Choose the region for your AKS cluster (e.g., East US).
- Select the desired Kubernetes version (e.g., 1.26.6).
2. Cluster Preset Configuration
- For practice purposes and development/testing tasks, select a cluster preset configuration that suits your needs, such as “Dev/Test.”
- This preset can provide you with predefined configurations optimized for these scenarios.
3. Availability Zones
- Specify the availability zones where your cluster nodes will be placed for increased resiliency.
4. AKS Pricing Tier
- AKS offers two pricing tiers for the managed Kubernetes control plane. Choose the pricing tier that best meets your needs.
5. Automatic upgrade Type:
- Choose an upgrade type to determine when the cluster will be upgraded based on new AKS and Kubernetes releases. (For example, you can choose “Enable with Patch” for recommended automatic upgrades.)
6. Authentication and Authorization:
- For authentication and authorization, you can choose to use local accounts with Kubernetes RBAC. This provides a native Kubernetes RBAC managed locally within your AKS cluster.
Click “Next: Node Pools” to proceed.

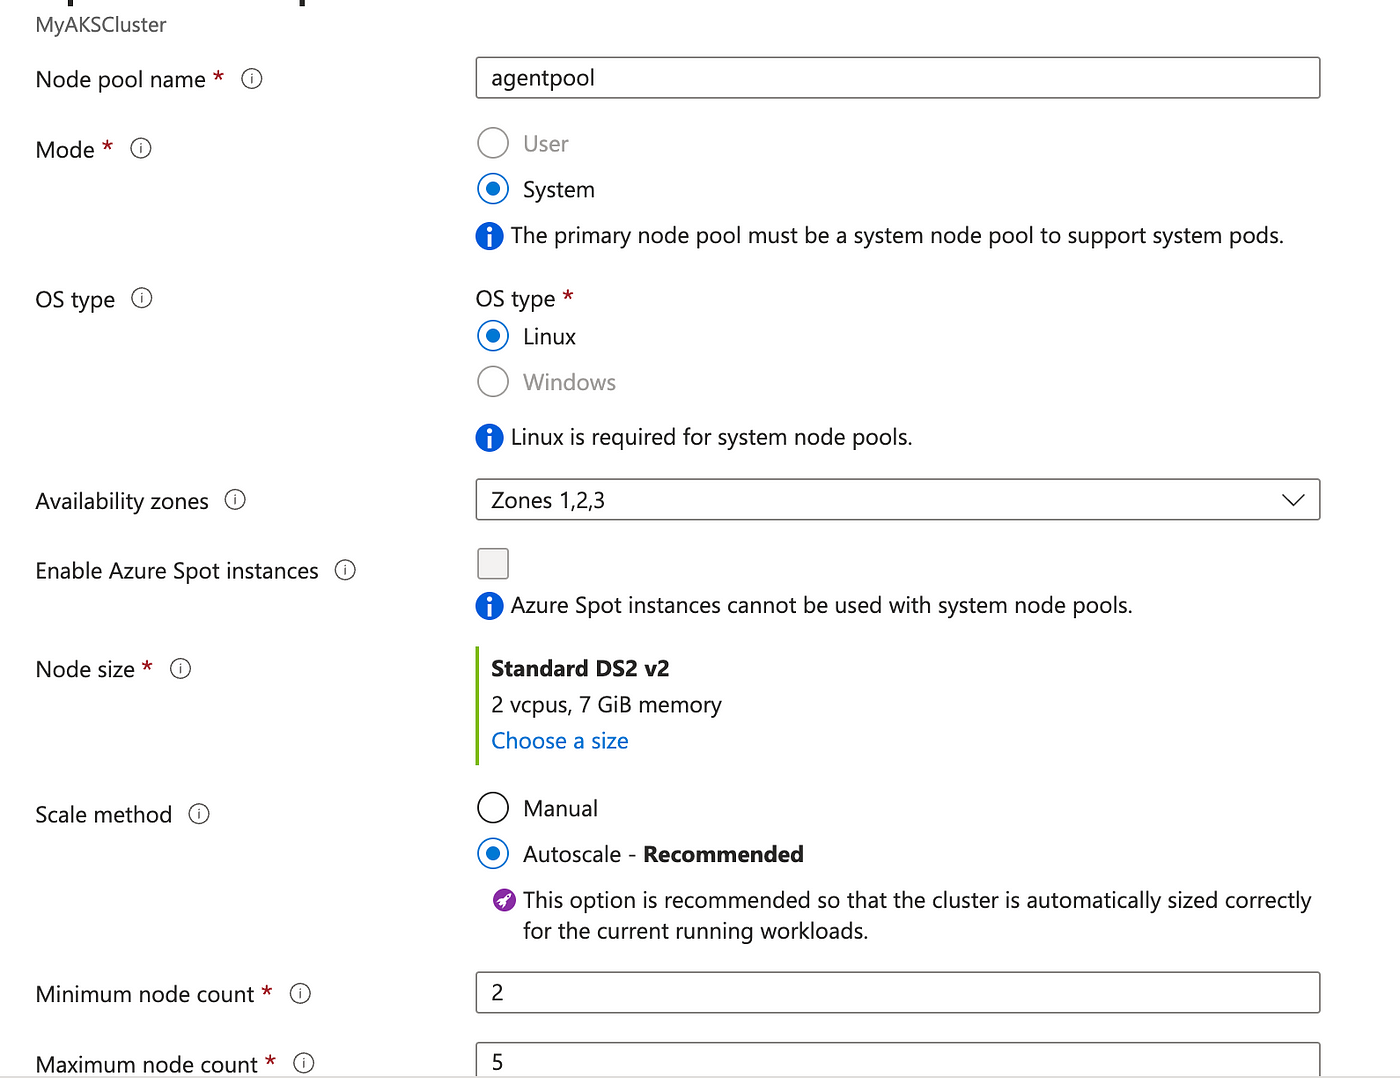
Node Pool
- You can add or customize node pools based on your application requirements.
- Define the number of nodes, VM size, and other settings for your node pool.

Click “Next: Networking” when you’re ready to proceed.
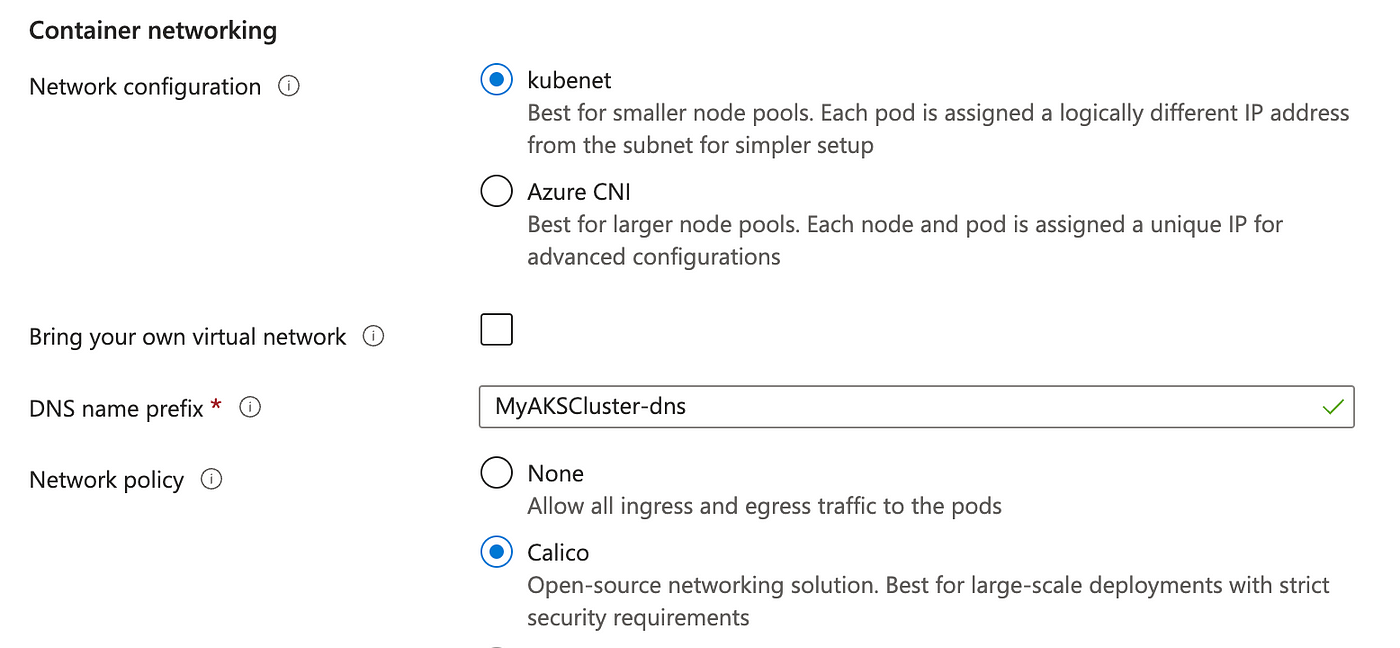
Networking
- Configure the networking settings for your AKS cluster. The default settings are usually sufficient for most use cases.

Integrations
- Configure integrations with Azure services and features.
- You can enable Azure Container Registry integration, Azure Policy, and more.
Click “Next: Monitoring” when you’re done.
Monitoring
- Enable monitoring if you want to use Azure Monitor and Azure Log Analytics for cluster monitoring and diagnostics.
Click “Next: Scaling” when you’re done.
Tags
- Add tags to your AKS cluster for better organization and management.
- Click “Review + create” when you’re done.
Review + create
- Review all the configuration settings to ensure they are correct.
- If everything looks good, click the “Create” button to start the provisioning of the AKS cluster.
Deployment
Azure will begin deploying your AKS cluster. This process may take several minutes.

Post a Comment